Tag Archives: programmering

Smart pointers vs Raw pointers

In c++ you use pointers very often, and they are the main reason for memory leaks and other problems. They allocate memory and if they are not deleted that is a memory leak. To avoid this problem the Smart pointers are to prefer.

A Smart pointer contains a Raw pointer – pointing to it, and it has the same size -, only the Smart pointer deletes the Raw pointer when it is no longer used. This means that you don’t have to worry about forgetting to delete it yourself.

This is an example from MSDNs website that shows the difference between the different pointer types:

msdnexample

The Smart pointer is then used just as a Raw pointer with the operators -> and *, but it has also got its own member functions which you can reach by using the dot like; smart_pointer.member_function();

This is a very useful pointer and I will absolutely be reading more about this and start to use Smart pointers instead of Raw pointers. But this is as far as I have gotten in researching this topic so far!


Visual Leak Detector – File and line number not available

When using Visual Leak Detector (vld) there are some problems you might encounter. The problem (I thought I had) was that it wouldn’t show what file and line number it found the memory leaks in. No matter how much I searched for this on google no one seemed to give me an answer that worked.

vld


When the running was done the top line of the vld output said (inside the green rectangle): “0x0F37C260 (File and line number not available): MSVCR120D.dll!operator new”. And where “File and line number not available” is; I thought the actual file and line number was supposed to show. This is however not the case!

It is the line after that which tells you where the leak is (inside the orange rectangle). The text before the orange arrow tells you which file has the leak, and the number the arrow is pointing to is the line number in the file. The text after the number tells you which method the leak is in. Then it’s just finding and correcting the leak and you’re done!


Recursion

This week in programming we have learnt about Binary Search Trees (BST). While creating the program for a BST recursion is a great method to know and to use. Recursion is when a method calls itself from inside. You can read more about it on wikipedias page about recursion: http://en.wikipedia.org/wiki/Recursion_%28computer_science%29

I thought I could go through how I wrote my code to find the node to erase in the tree and why I chose to do it in that way. Let’s begin with the parameters; I send in a generic value – the value of the node that I want to erase, and two nodes. The first node is the one the function should check if it’s the one to erase and the second is the node the function checked the last time. Why I want the parent node is for when I erase a node I need to change the pointer pointing at it from its parent. I won’t explain how I erase the nodes in this blogpost since that isn’t really relevant to the recursion. And if you really want to know more about BSTs and how you remove nodes you can read about it in this Wikipedia page: http://en.wikipedia.org/wiki/Binary_search_tree

parameters

The first time this method is called the first node is the root node – the node that is in the top of the tree, before this method is called I check that there actually is a root node else the tree is empty and there are no nodes to erase. And the second node is a null pointer since there is no node pointing to the root.

The first thing I check is that the node to check is not a null pointer since that would mean the function has reached the end of the tree and has not found the right value. If that happens I return false so the recursion will stop and this false will tell my program that the value was not found and it will write in the console something like “That value was not found, try again”.

If the node is not a null pointer I check if it’s value is the one I was looking for. If it was not I check if the value I am searching for is bigger or smaller than this nodes value. If it is bigger I call the function again sending the same value to find, the current nodes bigger child to be checked and the current node as the parent. If it’s smaller I send the smaller child instead of the bigger one. And the function starts from the beginning with the new parameters.

the_recursion_1

the_recursion_2

But if a node with the right value is found I have to check how many children it has. If it has one or no child I call another function to remove them and then I return true telling my program that the node was found and erased and it writes something like “The value was found and erased” in the console. And the recursion is done

.if_to_erase

But what I have done if the node has two children is to call a function that finds the value to replace the current nodes value with then change its value, and then I call the previous function again. But this time I send in the value of the node which value I copied to be found and erased, the node that is the current nodes smaller child to be checked and the current node as the parent. I don’t start looking from the top again because firstly it would be unnecessary since I know the node to erase is under this node, and secondly because the node found would only be the same node again since they have the same value.

remove_with_two

When the previous function finds this value it will erase it as a node with one or no children! (If you don’t understand why, look at the second Wikipedia page I linked in the beginning.)


Rooms done, and some AI

Today was a good day for my programming. I managed to put collision in all the rooms of our game. There was one room where it didn’t want to work but I’ll check why tomorrow. I probably just sent the wrong file to Tomas (while I made the collisionpoints for every room I sent the files to him so he would implement them). Tomorrow I will make some changes to the Collisionpoint-maker program so he can use it on the map. He’s going to make points where the textiles and enemies will spawn.

When the collision was done and we had had our lecture on pathfinding I started with the AI to the game. We long discussed if we are to have pathfinding in the game, if it’s worth the time since none of us has ever done it before. We came to the decision that it would be cool (and I really want to learn how to do it), so I took the responsibility for it. Hopefully it won’t take the rest of the project to get it right, but  that’s what we’re counting on. Though we want some simple AI for the smaller enemies (and maybe one boss if there’s time) for the alpha which is due next friday. So I thought I could start out with some move patterns and then build the pathfinding from that.

Simple AI

So I made this circle which travels from point to point, using circle to point collision. I think this code will do for the alpha as AI, depending on if we have the time to implement the different states on the enemies, we might want to add some sort of attack AI, at least for the ranged enemy but maybe for the melee one as well. Else the player will only take damage if he runs in to the enemies (which is probably not that likely).

After I have fixed the program for Tomas tomorrow, I will start with the pathfinding for real. It will take lots of research and trial and error testing. We got a tip from our teacher to look at this website and work from there:

http://www.gamedev.net/page/resources/_/technical/artificial-intelligence/a-pathfinding-for-beginners-r2003

So this is what I will do for the next couple of days/weeks/month. But hopefully it will work for our final version of the game!


Even more collision!

Today I worked some more on the collision-checks for the game. I got the line-circle collision to work with SFML. The code had been working for a while before I realized I had forgotten to update the players collider position when the player moved. Now it has been implemented and I will put it to the test tomorrow.

I have also added a check between two circles. Most of the objects (I believe all the objects but the projectiles) will have a circular shape. So this will check collision between enemy-enemy, player-enemy, player-object, enemy-object. And today I finally got to use some of that math I never thought I would from school.

pythagoras

The Pythagorean theorem.

I also improved the tool which we will use to set the points in our room which we will check the collision between.

pointsOnMap

The scale is 1:2 but the output is the correct points we will use later. For extra help I show the mouse position in the bottom right corner. The black lines (which might be hard to see in this picture) show the user where he/she has put the points and where the player won’t be able to get past. We will simply name the files after which room the points are for. As it is now you can’t choose the pixels that are at the edge of the picture, I will have to look in to that so there will be no gaps in between the rooms. Tomorrow I will put three of the rooms together and see how well this really works.


Suit ’em up – the first weeks

In this course we are going to make a game, we chose the concept “Suit’em up” which is a game where you are going to, as Barney the robot, cleanse a suit from bugs which has infested it.

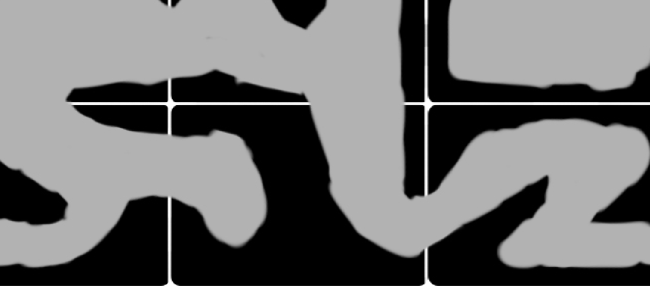
The first task I got from my lead programmer was to fix the collision system for the walls. We have discussed different options; we discussed alpha collision, some sort of tile collision, square collision and line collision. With the alpha collision we were going to add a layer with black and white colors where you can walk on the white but not on the black, we dismissed this idea pretty quickly as our teacher told us it would not be optimal. The tile collision we also dismissed quite quickly because there would have to be so many different tiles with different looks and they would have to be very small. We should probably not be able to use the same tile that many times, it would not be the most optimal solution either. With the square collision there would be too many small squares and really not the easiest to program since the terrain is not that straight. The walls of the different rooms will look something like in this photo:

Image

So we finally discussed the line collision. We talked about making a tool where we can set out different points along the walls and check the collision between them. So I made a prototype of this tool and it worked fine. So we thought we would give the line collision a try.

The prototype I made of the point-and-click-to-make-a-txt-file-with-points is written in c# and I used Windows Forms and it look something like this:

Image

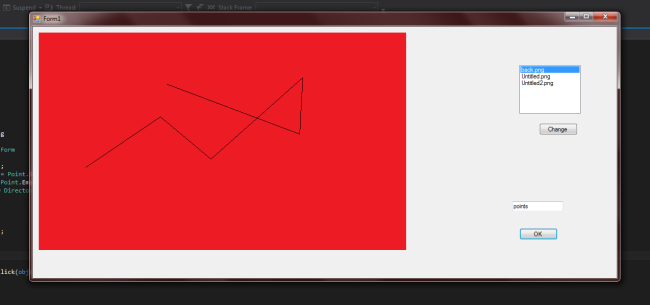
You can choose the background (preferably the picture of the room you want to put the points in), then click to set the points and save them in a txt-file with the name of your choice (preferably the name of the room). Then you just read the file in your game-code and save them in a vector to iterate through them to check the collision.

When I first started looking at the math it looked impossible. But I ❤ Google and after some searching I found this site.

Basic Collision Detection in 2D – Part 2

Which gave me almost exactly what I needed.

Image

This is collision between a circle (our player and enemies will have colliders which are circles) and an infinite line. All I had to add was the code that checked if the collision point was inside the outer points of the lines. As it is now I think it is not optimized but if we set in stone that we will use the line collision I will look in to it some more.

So I made a prototype of the collision system as well. With code from the site I mentioned earlier.ImageImage

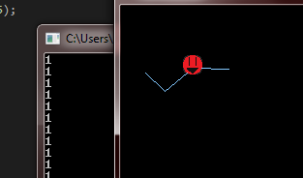
This is in SDL though, so I have to rewrite it with SFML and then implement it to the game.