Category Archives: School

Smart pointers vs Raw pointers

In c++ you use pointers very often, and they are the main reason for memory leaks and other problems. They allocate memory and if they are not deleted that is a memory leak. To avoid this problem the Smart pointers are to prefer.

A Smart pointer contains a Raw pointer – pointing to it, and it has the same size -, only the Smart pointer deletes the Raw pointer when it is no longer used. This means that you don’t have to worry about forgetting to delete it yourself.

This is an example from MSDNs website that shows the difference between the different pointer types:

msdnexample

The Smart pointer is then used just as a Raw pointer with the operators -> and *, but it has also got its own member functions which you can reach by using the dot like; smart_pointer.member_function();

This is a very useful pointer and I will absolutely be reading more about this and start to use Smart pointers instead of Raw pointers. But this is as far as I have gotten in researching this topic so far!


Visual Leak Detector – File and line number not available

When using Visual Leak Detector (vld) there are some problems you might encounter. The problem (I thought I had) was that it wouldn’t show what file and line number it found the memory leaks in. No matter how much I searched for this on google no one seemed to give me an answer that worked.

vld


When the running was done the top line of the vld output said (inside the green rectangle): “0x0F37C260 (File and line number not available): MSVCR120D.dll!operator new”. And where “File and line number not available” is; I thought the actual file and line number was supposed to show. This is however not the case!

It is the line after that which tells you where the leak is (inside the orange rectangle). The text before the orange arrow tells you which file has the leak, and the number the arrow is pointing to is the line number in the file. The text after the number tells you which method the leak is in. Then it’s just finding and correcting the leak and you’re done!


Recursion

This week in programming we have learnt about Binary Search Trees (BST). While creating the program for a BST recursion is a great method to know and to use. Recursion is when a method calls itself from inside. You can read more about it on wikipedias page about recursion: http://en.wikipedia.org/wiki/Recursion_%28computer_science%29

I thought I could go through how I wrote my code to find the node to erase in the tree and why I chose to do it in that way. Let’s begin with the parameters; I send in a generic value – the value of the node that I want to erase, and two nodes. The first node is the one the function should check if it’s the one to erase and the second is the node the function checked the last time. Why I want the parent node is for when I erase a node I need to change the pointer pointing at it from its parent. I won’t explain how I erase the nodes in this blogpost since that isn’t really relevant to the recursion. And if you really want to know more about BSTs and how you remove nodes you can read about it in this Wikipedia page: http://en.wikipedia.org/wiki/Binary_search_tree

parameters

The first time this method is called the first node is the root node – the node that is in the top of the tree, before this method is called I check that there actually is a root node else the tree is empty and there are no nodes to erase. And the second node is a null pointer since there is no node pointing to the root.

The first thing I check is that the node to check is not a null pointer since that would mean the function has reached the end of the tree and has not found the right value. If that happens I return false so the recursion will stop and this false will tell my program that the value was not found and it will write in the console something like “That value was not found, try again”.

If the node is not a null pointer I check if it’s value is the one I was looking for. If it was not I check if the value I am searching for is bigger or smaller than this nodes value. If it is bigger I call the function again sending the same value to find, the current nodes bigger child to be checked and the current node as the parent. If it’s smaller I send the smaller child instead of the bigger one. And the function starts from the beginning with the new parameters.

the_recursion_1

the_recursion_2

But if a node with the right value is found I have to check how many children it has. If it has one or no child I call another function to remove them and then I return true telling my program that the node was found and erased and it writes something like “The value was found and erased” in the console. And the recursion is done

.if_to_erase

But what I have done if the node has two children is to call a function that finds the value to replace the current nodes value with then change its value, and then I call the previous function again. But this time I send in the value of the node which value I copied to be found and erased, the node that is the current nodes smaller child to be checked and the current node as the parent. I don’t start looking from the top again because firstly it would be unnecessary since I know the node to erase is under this node, and secondly because the node found would only be the same node again since they have the same value.

remove_with_two

When the previous function finds this value it will erase it as a node with one or no children! (If you don’t understand why, look at the second Wikipedia page I linked in the beginning.)


The Knytt Stories Assignment

Introduction

This rapport is about a group assignment by me, Malin Lundqvist, and my teammate, Simon Strandh. The assignment was to make a game using the Knytt Stories level editor and the restrictions were; the game cannot take more than 15 minutes to play and no text or signs were to be used. We had three weeks to complete the assignment.

We came up with the story of a princess who got afraid of taking the responsibility of being queen and the struggle of her confronting her fears.

The story

The story in our game is about a princess living in her protected castle where everything is happy and secure. One day her mother got sick and wanted to talk to her. Once the princess got to her mother and talked to her she died, but before dying she told the princess that it’s her responsibility to take her place on the throne. The princess got to feel sadness and responsibility for the first time, she freaked out and wanted to escape from these feelings and responsibilities so she runs away to find happiness and security again.

The world outside the castle wasn’t as safe and happy as she had believed, she quickly found herself lost in the world and didn’t know where to go. Walking around the world for a while overcoming and surviving challenges she found a house that started to making her feel secure again. She entered the house and found her teacher that helped her at the castle. He helped her to realize that running away from her feelings and responsibilities will not make you feel better, confronting them will make you stronger and wiser.

Feeling more confident than before she enters the world again and starts to tackle each obstacle by confronting her fears and feelings so she can get back up to the castle. Back in the castle she takes her rightful place on the throne and the story ends.

Method

In this assignment we had to use the Knytt Stories level editor to build our game. Me and my teammate sat down together to build the different scenes, find music and tile sets together.

Here are some explanations about some of the key scenes and how we built them to tell our story.

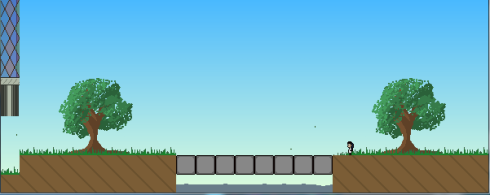
Key scene one, when she wants to run away

.när hon ramlar ner

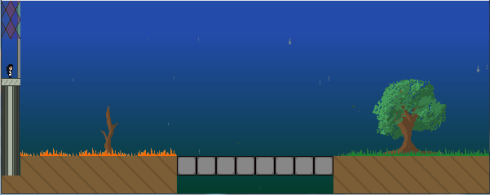
In this scene we wanted to show the player how the princess wants to find safety and happiness outside the castle, represented by the other side of the gap being green and happy looking. The grass on her side is orange and dead, the same with the tree, the contrast representing her feelings of wanting to run away and find a happier place.

The bridge between these sides represents the princess’s hope of finding this happier place. Halfway over the bridge she falls through not being able to reach the green happy side. The player can walk over the first half of the bridge, getting his or her hope up that reaching the other side is possible. When falling through the bridge that hope is crushed, you can’t make it.

Key scene two, when she has landed.

när hon landat

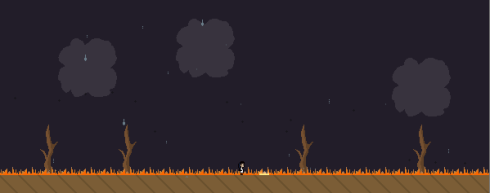
In this scene there are no obstacles, no signs showing the player where to go, representing the feeling of being lost. The player can choose which way to go, there is no correct way, and both ways leads to the same place in the end. The world is not as green and secure as the princess thought and she is now confused and lost in a dark place of the world. Here we delete the power up of running from the player, representing that she is more cautious and don’t have the same drive as before. The music changes to a more mysterious and scary tune helping the representation of a scary and unwelcoming world.

Key scene three, the somewhat safe feeling of a house.

kattens hus

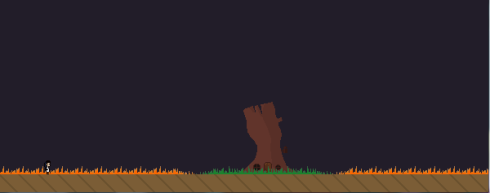
In this scene there is a house in the middle with green grass in front of it instead of the orange dead grass that has been seen so far down here. This is representing that this is a place where the princess feels a little safer than the rest of the world, telling the player that he or she should go there.

Key scene four, the helpful cat.

katten i huset

Inside the house there is the same cat as the player met back in the castle. This is because the player should feel something familiar and safe. After the cat talked to the princess he gives her two power ups; running and wall climbing. We give the running power up because the princess now feels a little more drive to get back to the castle, and the wall climbing power up to show that she now can pass obstacles she couldn’t pass before, representing that she is now confronting her fears and is now able to pick herself up. Also the music inside the house is happier.

Key scene five, back at home.

inte ramla ner

This scene is the same as key scene one, only the orange, dead side is now back to its healthy green look. There is nothing scary with the castle side of the gap, and there is now a door open at the bottom of the castle. The bridge is now whole with water under it and the princess won’t fall down. This is representing the princess coming back to the castle after confronting all her fears, ready to take on her responsibilities. The music in this scene is the same as in the absolutely first scene of the game, where the princess felt safe and happy.

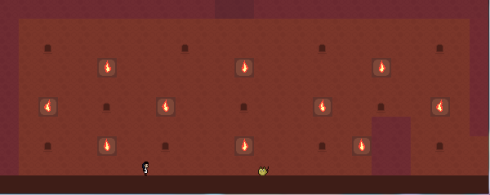
Key scene six, taking responsibilities.

tronrummet

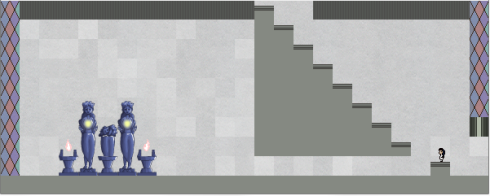
This room is now more sparkling, more appealing to the princess, representing that she wants to go to the throne, also showing the player that the throne is where to go. She is now ready to take her responsibilities seriously and the game is finished when she sits on the throne.

Analysis

What went good

We sat together all the time during this assignment, which made it easy to discuss problems and structure of the game. I think the storytelling of the game benefited of this because when one of us changed something we could quickly get feedback from the other.

We began this project with a general idea of what the story would be like. We started by drawing the basics of how we wanted the game to look like and added more details as we went along. This made it easy for us to add things as we got more and more familiar with the level editor and its restrictions.

What went bad

It took a while to learn the editor and all its restrictions. But as we learnt it, it was quite easy to use its restrictions to make a good game. The tutorial pdf was a lot of help and was used a lot during this process.

One of the restrictions in the editor that made it quite difficult to set a good setting in each scene was that only two tile sets could be used at the same time. I believe we managed to work around it and represent feelings rather well despite of this.

Summary

This assignment taught us how to tell a story without using our words. I think it went rather well and I am happy with the result.

Me and my teammate worked well together and I think we really benefited by sitting together while working with this. We also made a good choice by starting with a basic story and evolving it as we went along. Else the restrictions of the editor could have been much more restricting.


For those of you who have Knytt and want to try the game, here’s a link: https://www.dropbox.com/s/xjcica1kruig4c9/Simon%20Strandh%20Malin%20Lundqvist%20-%20Knytt%20Assignment.knytt.bin?dl=0


Betrayal at House on the Hill, board game analysis number two.

Betrayal at House on the Hill is a board game with two phases. In the first phase you and the other players work together to explore the house and find all the things that is hidden inside. In the other phase one of the players will turn into a traitor, he or she might turn into a monster or maybe he or she will create a monster haunting you. Or you might all still be friends and the house turns on you and you have to work together to get out. There are a lot of different things that can happen in the second phase depending on which room he or she is standing in and what omen he or she triggered it with (I will explain this later in this blog).

2014-09-23 14.13.30

Items

In the game there are some items that you have to keep an eye on:

Character stat cards

Every player chooses one character they want to play and each character has a character stat card. On this card there are some stats – might, sanity, knowledge and speed. Each category has 8 numbers in descending order ending with a skull, not necessarily from 8-1 rather the same number appears several times in a row. Might and speed are physical stats and sanity and knowledge are mental. If you take physical damage you can choose to split this damage between the two stats and the same with the mental stats. You have one marker for each stat that points on the number you’re currently at, if you take damage this marker moves one step towards the skull in the bottom.

2014-09-23 14.14.31

Room cards – At the beginning of the game the room cards are shuffled and laid upside down in a stack next to the beginning rooms (the hallway, the upper landing and the basement landing). They have different symbols on them deciding if and which card you will draw when you enter the room. They have different names and can be put on specific floors, this is shown on the back if it can be put on upper, ground or basement floor or if it can be placed on any of them.

The cards

  • Item cards – The items on the item cards can help you or make the situation worse. It can add or remove stats for the player carrying it. Sometimes
  • Event cards – In some rooms there is an event happening when you enter it, if you are the first person entering the room you draw an event card telling you what happens. You might fall through the floor down to the basement, taking physical damage, or you might run into a ghost telling you something. Often you need to roll a dice to see if what happens to you is good or bad, if you lose a stat or if you gain one or more.
  • Omen cards – Among the omen cards there are some companions you can find, and there are some items and some events. You can be bitten and have roll to see how much damage you take. The companions might give or take away some stats or both. After you draw one of these cards you have to roll a number of dice to see if the next phase – the haunt – will begin or not. If the eyes on the dices are equal to or more than the amount of omen cards drawn the haunt will not begin yet.


A play through

The first phase – the exploring phase

In the exploring phase the players may move as many rooms as their speed shows. If you move through a doorway and there is not already a room there you draw the first room card in the pile that can be placed on the floor you are currently on. Then you place this room with one of its doorways connecting to the doorway you just went through and place your character there. If the room does not tell you to draw a card you can move on exploring new rooms or passing through already explored ones. If it tells you to draw a card you draw the type it says – item, omen or event – and do as it says.

In some rooms there are additional instructions that should be followed either when you leave the room or when the first person ending his or her turn in that room.

If two players are in the same room they can steal items from each other or trade them. When we played the first time one of our players got an omen card saying the batteries in his flashlight were out so he could only take one step each round until he found a candle or was in the same room as another player that could give him some batteries. So this is a game where you help each other but at the same time can backstab your friends by stealing their things and hurting them. This might be bad as they might die really early in the next phase so they can’t help you kill the monster/s if that is what appears in the haunting.

If someone fails the haunt roll (the roll with 6 dice after an omen card has been drawn which I described earlier) the second phase begins.


The second phase – the haunting

The haunt phase starts with the player drawing the omen card checking who the traitor is. This depends on which omen card was drawn when the haunt roll was initiated and in which room the player is standing in while drawing the card. The player that becomes the traitor gets a special manual with all the possible scenarios. Which haunt is going to happen is decided exactly like who is the traitor. The traitor then leaves the room and reads in on the haunt, what will happen and how. Meantime the heroes (the other players) read in another manual what will happen on their part, what they have to do to win.

When all know what is happening and what they have to do the traitor return to the others and prepares the haunt. In the two times we played the traitor ones became a snake with two heads and the other time she created Frankenstein’s monster. To win the heroes had to kill the two heads of the snake or to kill Frankenstein’s monster. For the traitor to win she had to kill all of the heroes or with the snakes heads have been in sixteen rooms. So this game has a lot of different and interesting endings


Core game system

We discussed this in the group and found it extremely hard to decide which the core system throughout the game was since it has two phases. But we decided that it was exploring new rooms in the house. Since you can do this in both phases and it is what basically triggers the haunting phase.

2014-09-23 14.14.57

The best

The best things in this game are the storytelling, the multiple endings, the dice and the randomness. The dice have 0, 1 and 2 eyes on its sides which make it possible to take no damage at all since the damage is based on dice roll. The storytelling, randomness and multiple endings makes it fun to play this game over and over again since it’s so different every time, you will probably never get the exact same gameplay twice. With the randomness I mean during the exploring phase – the rooms appear in different order and places, and the cards are drawn randomly.


The worst

The worst part of this game was the characters being so unbalanced, one of the characters was just dominating both of our gameplays. And the stats between the characters are not balanced, some hade very low numbers on their stat cards and others (specially one) had very high numbers. These numbers decide how many dice you get to roll in each skill check which makes it very much easier for some of the players to make these.


Both good and bad

In the exploring phase you mostly explore new rooms and most of the rooms makes you draw a card and can’t take any more steps. This is both good and bad since it makes you feel very slow, but you won’t get an advantage if you start.


Most interesting system

The most interesting system in this game is the haunt since it varies the so much. There are about 40 different haunts and in some of them the traitor isn’t a traitor but still a hero and the house is against the heroes. It’s just so many different scenarios and it makes the game interesting every time you play it.


Target audience

The target audience for Betrayal at House on the Hill was over 12 years. We agree that the players should not be under 12 years since they probably don’t have as much patience and understanding as someone over 12. But we do think that the age should maybe be a bit higher than 12 since if the one who becomes the traitor is 12 years it might be hard for him or her when all the other players are against him or her, and it might be hard to keep track of everything alone for such a young person. This could be fixed by a parent or older friend or someone like that chooses to help so there are two traitors instead of one.


Summary

So this game is all about the story and exploring. It is fun because there are so many different endings and gameplays and it’s probably enjoyed by everyone who likes storytelling and probably role-players as well.


Kill doctor Lucky, board game analysis

“Kill doctor Lucky” is a game for 3-7 players where the player who succeeds to kill the doctor wins. Moving around in his mansion you have to make sure that no one can see you while you’re in the same room as the doctor, that’s when you can strike and make an attempt to kill him. Although his dog follows him everywhere, and can actually prevent a murder on the doctor, he has short legs and sometimes falls behind as the doctor rush through the mansions many rooms.

2014-09-04 15.33.27

The components in the game

Modifiers

The modifiers are the cards and tokens that modify things within the game. There are:

  • Room cards – If you use one of these cards you can teleport either yourself or the doctor to the room which the card shows.
  • Movement cards – When you play this card you can use it to move either yourself or the doctor as many steps as the card(s) shows.
  • Weapon cards – When you make a murder attempt you can play a weapon card which gives you extra murder points. Some weapons are stronger in specific rooms and gives more points.
  • Failure cards – When someone tries to kill the doctor it can be stopped by the other players, if the sum of all the failure points, shown on the cards played, exceeds the murderer’s murder points the attempt fails.
  • Spite tokens – After a failed murder attempt you get one of these tokens which you can use in another attempt of killing Lucky. They give you plus one murder point per token you use. They are then discarded from your hand when used.


Players

You can in one turn move one step, try to kill the doctor (or his dog) and play one or more cards from your hand. At the end of your turn you get to draw a card – if you have not used a card this turn or tried to kill the doctor.

Rooms

The different rooms in the doctor’s mansion have different names and numbers. Not all the rooms have names or numbers. The numbers determine where the doctor will move next, he jumps from one room to the one with the next number. If a room does not have a name the player in that room may not draw a card at the end of his or her turn.

NPCs

The NPCs in this game are the doctor and his dog. The doctor moves from one room to the other using their numbers to determine where to go. His dog moves one step at the time always the shortest way towards the doctor. The rooms the doctor jumps between aren’t always placed right next to each other, which makes the dog fall behind.

npcs

The best

The Line of sight (LOS) system

If someone is in your LOS they can’t make an attempt to murder the doctor, even if they are in the same room. Your LOS is all the rooms that are connected with doors to the room you are in. Your LOS persists to the next room if there is an opening in the same height as the first door. In the picture you stand in the corridor marked with yellow and can see in all the rooms where the green arrows point, but not in the room with the red arrow since that door is not in the same height as the first door.

line of sight

In some rooms you can see almost half of all the rooms in the mansion, preventing a murder attempt in all those rooms, but if you see someone they can also see you – preventing you from murdering the doctor. In other rooms almost no other room are in your LOS making it easy to kill the doctor. This system made it easy to prevent a murder one turn and in the next turn step into another room and try to kill the doctor yourself.

The dog

The dog did almost always stop you from killing the doctor with his LOS (if he saw you, you could not make an attempt to murder the doctor). He made the gameplay much longer – we played once without the dog and it was much easier to make a murder attempt. It also made us move more and not stand still in a room with less LOS and wait for the doctor to come to us instead. Even though we all wanted the dog murdered so it would be easier to kill the doctor it was quite hard, since you can’t kill the dog if someone sees you (the doctor didn’t care, you could be in the same room and he wouldn’t notice a thing).

The room cards

When played – a player or the doctor suddenly was in another part of the mansion, maybe disrupting your evil plan for the doctor.

The worst

The change of turns

When the doctor enters the room you’re in, it is automatically your turn. If you can move into the room he is going to next you can farm cards, as you may draw a card after your turn is over (with some exceptions I have already mentioned).

As the turn then continues as usual, to the next person, it might result in someone not getting any turns, no cards and no chances to kill the doctor. We discussed this problem and came up with the idea that the player which room he enters only gets a chance to kill the doctor and not an entire turn. And then the turn continues from the person who last had a turn. We didn’t try this out, but it would be interesting to do.

The weapon card balance

Some weapons have bonus damage in some of the rooms. This bonus is somewhat not balanced, one might think that the rooms with the greatest chance to get seen should have the highest bonuses. This is not the case, the room with the biggest bonus is the room where almost no one can see you, not really high risk high reward rather – low risk high reward. Even if it would take a rather long time getting to those rooms if you had the room card with that room you would be there in one turn.

Movement

The movement of the players is too slow which encourages camping (staying in the same room just waiting for the doctor to come to you), and the low amount of movement cards doesn’t help, neither the fact that you may not take a card in every room (only the rooms with a name, so no corridors or stairs for example). The players may take one step every turn so it might take a very long time getting to the room you want to go to. You might miss the doctor since he moves after every turn, then you have to wait for the doctor to make an entire lap around the mansion, hoping that no one teleports him right before he gets to you.

The most interesting

The system we all thought was the most interesting in the game was the Line of sight system which I described earlier. This is partly because you could see very far and, by just taking one step, you could see almost nowhere. In some games your LOS is just to the rooms next to you, we all thought it was pretty interesting when we first read about the system in the rule book.

Target group

The target group for this game was families and people of ages 10 and up. We all agreed with this target group since it is a very social game where the people you play with can make the game fun or just simply boring. The line of sight system and the dog’s movement and role in the game might be hard to understand for younger children. This makes the age suggested very appropriate.

The artwork in the game is sort of dark but the colors are at the same time very bright. This captures the dark motive in the game (killing the doctor), but also lightens it up with the strong colors making it somewhat more child friendly.

Summary

This game reminds me of the late nights at home playing “Cluedo” with my family, though the motive in the game is quite the opposite, instead of finding the killer you want to be the one killing.

I think the game really benefits from the line of sight system and the dog since it lengthens the gameplay. There should be less failure cards because after a few failed murder attempts it wasn’t as fun anymore, and when we tried to play with less failure cards the gameplay was shorter but more intense.

There are a couple of different tactics in this game, you could just attack the doctor every time you get the chance and always use your spite tokens forcing everyone to play their failure cards. You can also be the one attempting murder all the time but without spite tokens, collecting them and make one big strike hoping that the others already have played most of their failure cards. Or you just wait, not attempting any murder, lurking in the shadows seemingly innocent and when you see that all the failure cards are played you strike when everyone expect it the least.

I do believe this game would be more fun with fewer players. You would get to do more and not wait for so long for the chance to get close to the doctor. But that would also make it easier to camp and avoid others LOS which would lead to less movement.

players


Particle Effects

Since there is only about a week left on this project and we have a working game that is almost finished, we are just adding things for fun (and sometimes because they are useful). This week I have been writing the code for adding particle effects in the game. We will use these effects when our charging enemies are loading their charge, right before our whack-a-mole boss comes out of the ground, when Barney (the avatar) dies and more things like that.

I started by writing the code for the particles in the class Particle. They consist of a sprite (a picture), a lifetime timer, a speed and a star position. When it is created it gets a random direction in which it will travel the whole time it exists. You can add some code making it move in another way, perhaps like an arc, but I think it looks quite well when it moves in just one direction, since its lifetime is pretty short. After the lifetime timer is up the particles sprite starts to fade until it is totally transparent.

running

To manage these particles I created a ParticleManager class which consists of a vector containing Particle pointers and three functions that adds, update and draw the particles. When adding particles you decide which kind of particle you want to create, this decides which sprite to use for the specific particle. Then you also decide how many of that kind you want to add and where you want it to spawn. Then the manager adds the particles to the vector and loops through the vector in every update to update the positions and timers for all of them, and draw them to the screen.

When creating lots of these at once it could look like a dust cloud coming from the ground, but in my example pictures I have used a placeholder-sprite of a muffin. For example we will add these when our kiting-boss dies and his ball of manure and grass will sort of explode into pieces.

The rest of the week I will be adding these particles where they are supposed to be, which means I have to add the manager to all the enemies, bosses and the avatar. I have to adjust the amount of particles that are created each time so it won’t take over the screen and steal the attention from the other things going on and so they won’t be unnoticed.

too_much    too_few


Downtime

This Monday we had a play testing where we got very much and good feedback. But one thing we have been discussing in the group is the downtime in our game – the time where there isn’t much to do in the game. For example when you have killed a boss and have to run all the way back to the beginning and you probably have killed all the enemies on your way to the boss already. Or if you die and have to run back to where you died, and the same thing there, you have probably already killed all the enemies. This downtime is something we want to get rid of. We have discussed doing this in three ways.

1. Teleportation. When you have defeated a boss we have discussed to put some sort of portal back to the beginning. This might be needed since the level  is built like it is, there are one boss at each end of the map so you have to go back all the way from one boss to get to the next and then back to the beginning again to get to the last and final boss. The plus is that the downtime will be drastically reduced, the negative is that if you haven’t found all the hidden rooms or all the textiles, you have a second chance if you run all the way back. This of course is something the players will have to decide themselves if they want to teleport or run, if we implement it.

map

2. Destructibles. One thing that might make it more fun to run all the way back is if there are stuff you can shoot and destroy. To fit our theme in the game we have discussed having some eggs along the path that the player can destroy just for fun. And if we add achievements to the game (if we feel like it and have the time, it’s not something we have planned to implement) that could be a fun one, to find and destroy them all.

Egg

3. Checkpoints. As it is now, when you die you start from the beginning again forcing you to run all the way back to where you died, with nothing to do (if you had killed all the enemies the first time). So our solution to this is adding checkpoints in the hidden rooms, so if you die you start from the last checkpoint you passed.

checkpoint

The only one of these that we have decided so far to implement in the game are the destructibles, the eggs. We’ll see if the rest is going to be implemented as well if we have time.


Bosses implemented

This week I have finally implemented the AI for all our three bosses, and tried to balance them somewhat. I will explain some of the balancing in this post, for the bosses’ different AI take a look at my previous post from last week.

I started with our boss Grubby McGrub (the whack-a-mole boss). When he shoots up from the ground he will shoot some slime at you. I started with one, aimed at the player, and then added four more shooting out from him in the directions of a + and an x:

fewSlimes

After some testing from Ludde in my group he complained about how easy it was to avoid the slime, so I added 24 more!

manySlimes

Now it’s very much harder to avoid the slime, especially since he shoots up from the ground almost right beneath you. You only have a very short time to move from where he comes up from the ground, the only thing alarming you is the cracks in the ground. This I also had to balance some since first I set it too low, you didn’t have a chance to get out of the way. Now you can barely make it. I still have to balance his life and damage but that will happen sometime next week. Then I have to try all the set bonuses and without any textiles at all to find out how much is the right amount.

Then I started with the boss Ben Bugger (the kiting boss). The things I have balanced with his fight is how often he shoots his slime, how slow/fast the player and the boss will run while in the goo and while not in it.

slimie

At first I managed to forget to reset the timer that decided when to increase the boss’ movement speed so he got a really high speed almost directly as the fight began so the player was unable to run away from him. This I discovered pretty fast and also changed the timer to a shorter time since we want him to be really fast and annoying. He won’t be super-fast though since when he is in the goo or he hits the player his speed reset. I believe he is still a bit too fast, since the player has 500 in speed and the boss starts with 400.

As with Grubby I still have to balance the health and damage for Ben, but it’s the same problem – I have to test all the possible combinations of textile.

The last and final boss I haven’t balanced that much yet, it’s not that much to balance since he won’t do any damage himself, and all his minions are already quite balanced. The timer for when he spawns his minions is quite long, but the thought is that he spawns them when he reaches 75%, 50% and 25% of his life as well. It’s his health I have to balance later.


AI for the bosses

Even though I have been home with a fever this week I have tried to do some work from home. I have been drawing some sort of flowcharts over the three bosses AI. The boss I am going to start with when it comes to code is the final boss, Mothgomery. This because if we run out of time we think this is the most important one for the game. He is the “emperor of the suit” who started the invasion and leads the other bugs.

First when you enter the room with Mothgomery all the exits close, then Mothgomery says some cool line to start the fight. Mothgomery then has two phases in the fight. He starts in phase 1 where he is invulnerable and he lets four of his minions (Buggers and Grubligs, the normal enemies) fight to protect him. When all his minions are dead he will enter the second phase. Here Mothgomery is vulnerable, he stays in this phase until he is down to a certain percent of his life or (if it takes too long time) the time is up. Then he goes back to phase 1 again. This goes on until the player has killed him, and wins the game. The minions will have a different AI than the normal bugs, they will always be in their chasing AI so they follow the main character, Barney, wherever he goes.

A_Mothgomery_Boss

Before you can challenge the final boss you have to meet and defeat the two other boses, Ben Bugger and Grubby McGrub, who will have a quite simple AI aswell. Ben, who is the boss you have to kite to kill, has only one phase. He follows you around the room trying to catch and kill you. He will only get faster and faster as time goes. There will be some sticky goo on the floor which the player should try to kite him through, because Ben will be slowed and take more damage. While kiting Ben the player has to shoot at him to lower his life and kill him.

tilltomas

Grubby will have two phases. He is the boss which acts kind of like a whack-a-mole. In phase 1 he is underground moving towards Barney with quite some speed. As he reaches his target he enters phase 2. He shoots out of the ground while shooting some icky goo around him. If Grubby hits Barney on his way up Barney will take a lot of damage. If the goo hits Barney or the player run over it, he will take damage but not as much. In phase 2 the player can shoot at Grubby to lower his life before he digs into the ground and starts chasing Barney again.

Concept_Grubby_McGrub_Boss